Remix Infinite Scrolling
In this blog post, we will cover developing infinite scrolling in Remix using standard query string based paging technique. You might have used Fetch to load data on demand for infinite scrolling in past and while using Fetch will work with Remix, using query string provides a better and an easier alternative, leveraging browser URL to maintain the state! Let's see how to do this.
Content
- Stater Project
- Get First Page
- Get Second Page
- Basic Paging
- Aggregate Paging
- Infinite Scrolling
- Initial Load
- Next Steps
Stater Project
I will be using RemixFast to generate codebase for a ready to run Starter project, but you can use the Indie Stack to create your project as well, just create model along with route, and follow along.
Login to RemixFast and click Create and enter following
App Name: 'Infinite Scroll'
Type: 'Starter App'
App Name: 'Infinite Scroll'
Type: 'Starter App'Next find the newly created app Infinite Scroll (first one in the list) and select it to launch Visual Editor. In Visual Editor ensure you are on Models tab and click Add to create new model and enter following:
Model Name: 'Widget'
`Tab` and create columns
widgetName
widgetNumber
Model Name: 'Widget'
`Tab` and create columns
widgetName
widgetNumberClick Done, this will create Widget model. Next click Export Code (in upper right corner), and select following
App Version: '1.0.0'
Stack: 'The Indie Stack'
App Version: '1.0.0'
Stack: 'The Indie Stack'Click Export Code This will create a ready to run starter project with models and routes. Select Code tab, and then click Download Code to download the generated code. Expand downloaded code package and take a minute to examine auto generated code, please do not run/init project just yet.
Seed Data
Lets seed Widget table with some data for testing. Copy following code into prisma\seed.ts just before console.log('Database has been seeded. 🌱');.
for (let i = 0; i < 1111; i++) {
  let data: Prisma.WidgetCreateInput = {
    widgetName: `Widget ${i}`,
    widgetNumber: `W-${i}`,
  };
  const w = await prisma.widget.create({
    data,
  });
}
for (let i = 0; i < 1111; i++) {
let data: Prisma.WidgetCreateInput = {
widgetName: `Widget ${i}`,
widgetNumber: `W-${i}`,
};
const w = await prisma.widget.create({
data,
});
}We are creating dummy widget data and inserting into Widget table. Now run npm run init and you should have database with widgets populated.
Get First Page
Lets display first page of widgets. Find app\routes\widget.tsx and locate WidgetRoute function. Replace function with following
export default function WidgetRoute() {
  const { widgetList } = useLoaderData<typeof loader>();
  return (
    <div>
      {widgetList.map((w) => (
        <div key={w.widgetId}>
          <div>{w.widgetName}</div>
          <div>{w.widgetNumber}</div>
        </div>
      ))}
    </div>
  );
}
export default function WidgetRoute() {
const { widgetList } = useLoaderData<typeof loader>();
return (
<div>
{widgetList.map((w) => (
<div key={w.widgetId}>
<div>{w.widgetName}</div>
<div>{w.widgetNumber}</div>
</div>
))}
</div>
);
}We are using hook useLoaderData get widgetList that was sent from our loader and just iterate over it to display list of widgets.
Start project with npm run dev and go to http://localhost:3000/widget
You should see first 20 widgets 🚀 You can even turn off JavaScript and it will still show first 20 widgets thanks to Remix SSR! ✨
Get Second Page
Now that we are able to get and display first 20 widget records, lets get next 20 widgets. Add following code before last </div>
<Link to="?skip=20">Next Page</Link><Link to="?skip=20">Next Page</Link>And Link to existing `@remix-run/react' import declaration
import { Link, useLoaderData } from '@remix-run/react';import { Link, useLoaderData } from '@remix-run/react';We are requesting server to skip first 20 pages and get next page.
Start project with npm run dev and go to http://localhost:3000/widget
You should see first 20 widgets. Click Next Page and you should see next 20 widget records. We now have basics working and know how to get first and second page. And it also works without Javascript!
Basic Paging
Ok, time to remove hardcoding and request next page based on the current page. We know which page user is on based on URL query string parameter skip.
- skip = 0 => First page
- skip = 20 => Second Page
So to get the next page, we just have to read current page from URL and change it to the next page. Here is the code (insert just below useLoaderData line)
const pageSize = 20;
const [searchParams, setSearchParams] = useSearchParams();
const skip = +(searchParams?.get?.('skip') || 0);
const pageSize = 20;
const [searchParams, setSearchParams] = useSearchParams();
const skip = +(searchParams?.get?.('skip') || 0);And useSearchParams to existing `@remix-run/react' import declaration
import { Link, useLoaderData, useSearchParams } from '@remix-run/react';import { Link, useLoaderData, useSearchParams } from '@remix-run/react';and replace old Link with following
<Link to={`?skip=${skip + pageSize}`}>Next Page</Link><Link to={`?skip=${skip + pageSize}`}>Next Page</Link>We use hook useSearchParams to get existing search parameters and read skip param from it. Next we change Link to use skip that we read from URL and add fixed pageSize to it. This way we are always requesting current page + pageSize = next page!
Run project. Click Next Page, each time you click Next Page, notice URL changes and skip gets incremented and we are getting next page of data! We now have basic paging working!
Aggregate Paging
Currently we utilize useLoaderData to get list of widgets to shows. Every time we call get next page, server queries database and gets next sets of records. We read those and display page. In order to support infinite list, we just need to aggregate data! (add following code below the const skip line)
const [data, setData] = useState<Widget[]>([]);
useEffect(() => {
  setData((prev) => {
    const lastWidgetId = widgetList?.length ? widgetList[widgetList?.length - 1]?.widgetId : 0;
    if (prev[prev?.length - 1]?.widgetId === lastWidgetId) return prev;
    return [...prev, ...widgetList];
  });
}, [widgetList]);
const [data, setData] = useState<Widget[]>([]);
useEffect(() => {
setData((prev) => {
const lastWidgetId = widgetList?.length ? widgetList[widgetList?.length - 1]?.widgetId : 0;
if (prev[prev?.length - 1]?.widgetId === lastWidgetId) return prev;
return [...prev, ...widgetList];
});
}, [widgetList]);💡 We are checking last widget in existing list. If last widget in existing list is same as in current list, we skip adding current list. This will prevent duplicate due to use of useEffect in DEV environment
Also add following import declaration
import { useEffect, useState } from 'react';import { useEffect, useState } from 'react';And change code to display list as below
return (
  <div className="h-full overflow-auto">
    {data.map((w) => (
      <div key={w.widgetId}>
        <div>{w.widgetName}</div>
        <div>{w.widgetNumber}</div>
      </div>
    ))}
    <Link to={`?skip=${skip + pageSize}`}>Next Page</Link>
  </div>
);
return (
<div className="h-full overflow-auto">
{data.map((w) => (
<div key={w.widgetId}>
<div>{w.widgetName}</div>
<div>{w.widgetNumber}</div>
</div>
))}
<Link to={`?skip=${skip + pageSize}`}>Next Page</Link>
</div>
);Note: We changed from iterating over widgetList to iterating over data, which is where we are accumulating data!
If you now run project, you will see that we are adding new catalog list page to existing data pages every time we click Next Page.
Lets add few states to track when we are fetching and if we still have items left to fetch (add code just below last useEffect)
const [loading, setLoading] = useState(false);
const [canGetNext, setCanGetNext] = useState(false);
// if last get list size === pageSize, we can try to get next page
useEffect(() => {
  setLoading(false);
  setCanGetNext(widgetList.length === pageSize);
}, [widgetListlist]);
const [loading, setLoading] = useState(false);
const [canGetNext, setCanGetNext] = useState(false);
// if last get list size === pageSize, we can try to get next page
useEffect(() => {
setLoading(false);
setCanGetNext(widgetList.length === pageSize);
}, [widgetListlist]);💡 We are using technique call Exact Fetch to get data. With Exact Fetch, we always request exact number of records and if we get what we requested, we assume that server might have more records. Other options is to do Over Fetching. With Over Fetching, on every request you ask for what you need (pageSize) + 1. If you get pageSize + 1 then you know that there are more records to fetch. Both techniques have their own pros and cons, you can go with either one, but I tend to use exact fetch as it is easier to code and maintain!
Infinite Scrolling
With this is place, now it is simple matter of hooking up to scroll event and getting next page every time we hit the threshold. Following diagram depicts relationship between what is visible area - viewport and what we want to show - content.
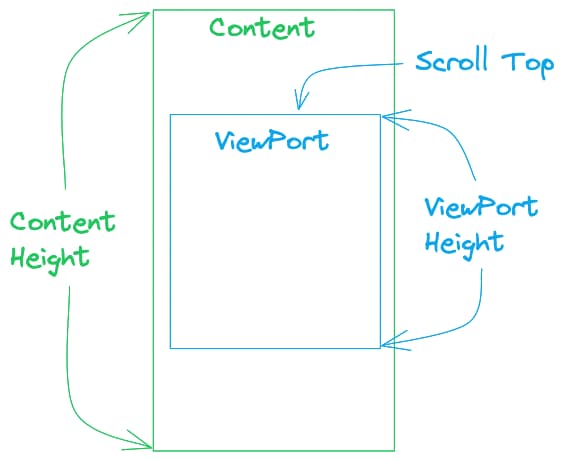
- ViewPort height = height of our list visible area
- Content height = total height of our list
- Scroll Top = how far user has scrolled the page
We will use a simple threshold formula, if contentHeight - scrollTope < 1.5 * viewPortHeight, meaning if we have scrolled past 1 and half page, and half page is remaining, we will get the next page. Here is the code for the trigger
// when user scroll, get next page if required
const handleScroll = useCallback(
  (event: any) => {
    const elem = event.currentTarget;
    if (loading || !canGetNext) return;
    const viewportHeight = elem.clientHeight;
    const contentHeight = elem.scrollHeight;
    if (contentHeight - elem.scrollTop < 1.5 * viewportHeight) {
      if (canGetNext && !loading) {
        getNext();
      }
    }
  },
  [canGetNext, getNext, loading],
);
// when user scroll, get next page if required
const handleScroll = useCallback(
(event: any) => {
const elem = event.currentTarget;
if (loading || !canGetNext) return;
const viewportHeight = elem.clientHeight;
const contentHeight = elem.scrollHeight;
if (contentHeight - elem.scrollTop < 1.5 * viewportHeight) {
if (canGetNext && !loading) {
getNext();
}
}
},
[canGetNext, getNext, loading],
);We start by check if we are already in load operation or if there are no more records to fetch, we bail out! Next we read content and scroll height and check if we have hit threshold, and if so we get next page!
And here is method to get the next page
// get next page
const getNext = useCallback(() => {
  if (!canGetNext || loading) return;
  const params = new URLSearchParams(searchParams);
  // skip
  const skip = +(params?.get('skip') || 0);
  params.set('skip', `${skip + pageSize}`);
  //
  setLoading(true);
  setCanGetNext(false);
  setSearchParams(params);
}, [canGetNext, searchParams, setSearchParams]);
// get next page
const getNext = useCallback(() => {
if (!canGetNext || loading) return;
const params = new URLSearchParams(searchParams);
// skip
const skip = +(params?.get('skip') || 0);
params.set('skip', `${skip + pageSize}`);
//
setLoading(true);
setCanGetNext(false);
setSearchParams(params);
}, [canGetNext, searchParams, setSearchParams]);Method getNext is doing exactly what we previously used Link to do, changing skip URL parameter, just that instead of user clicking Link, we are triggering getNext via code as they scroll!
Add onScroll to container as
return (
  <div onScroll={handleScroll} className="h-full overflow-auto">
    {data.map((w) => (
      <div key={w.widgetId} className="m-4 rounded-md border p-4">
        <div className="text-large font-semibold">{w.widgetName}</div>
        <div>{w.widgetNumber}</div>
      </div>
    ))}
    <Link to={`?skip=${skip + pageSize}`}>Next Page</Link>
  </div>
);
return (
<div onScroll={handleScroll} className="h-full overflow-auto">
{data.map((w) => (
<div key={w.widgetId} className="m-4 rounded-md border p-4">
<div className="text-large font-semibold">{w.widgetName}</div>
<div>{w.widgetNumber}</div>
</div>
))}
<Link to={`?skip=${skip + pageSize}`}>Next Page</Link>
</div>
);Update react import declaration to include useCallback
import { useEffect, useState, useCallback } from 'react';import { useEffect, useState, useCallback } from 'react';Run project, scroll down and it should automatically get next page! If you have a large monitor, you might have to hit Next Page few times before Scroll bar appear and auto fetching on scroll works.
Initial Load
Lets take care of users with large monitors. Currently we only load when user scrolls, but if user has large monitor, first 20 rows will only fill portion of the screen. We will eagerly load additional 2 pages so that user has data to scroll.
// eager load first 3 pages
useEffect(() => {
  if (data.length <= pageSize * 2 && canGetNext && !loading) {
    getNext();
  }
}, [canGetNext, data.length, getNext, loading]);
// eager load first 3 pages
useEffect(() => {
if (data.length <= pageSize * 2 && canGetNext && !loading) {
getNext();
}
}, [canGetNext, data.length, getNext, loading]);Next Steps
Hopefully you now a good handle on how to do Infinite Scrolling in Remix using Query String based paging technique. You can build up on this by incorporating Seek/Cursor based paging instead of Skip/Take and supporting search, sort and other functionality.
While Fetch based infinite scrolling also works with Remix, with query string based infinite scrolling you end up leveraging browser to keep state and support progressive enhancements.
Find Source code with a ready to run project @ GitHub
RemixFast
RemixFast includes useInfinitePager hook to support query string based infinite scrolling with support for search, sort and efficient cursor based querying. RemixFast also includes useFetchPager hook to support Fetch based infinite scroll! Not a fan of infinite scroll, the usePager hook can be used for page based efficient navigation.