Remix Modal Route
Learn how to develop and display route in a Modal.
In this blog post, we will cover how to display a route in Modal, aka Modal Route, in Remix. We will be using shadcn/ui (Radix) Dialog/Modal component, but you can easily replace it with your preferred Modal implementation! Lets see how to do this.
Content
Stater Project
Start by creating a new Remix project using create-remix:
npx create-remix@latest modal-routenpx create-remix@latest modal-routeThis will create basic remix project.
Next install Tailwind CSS
npm install -D tailwindcss
npx tailwindcss init
npm install -D tailwindcss
npx tailwindcss initNext Run the shadcn-ui init command to setup your project for adding shadcn/UI components
npx shadcn-ui@latest initnpx shadcn-ui@latest initYou will be asked a few questions to configure components.json:
Would you like to use TypeScript (recommended)? yes
Which style would you like to use? › Default
Which color would you like to use as base color? › Slate
Where is your global CSS file? › app/tailwind.css
Do you want to use CSS variables for colors? › yes
Where is your tailwind.config.js located? › tailwind.config.js
Configure the import alias for components: › ~/components
Configure the import alias for utils: › ~/lib/utils
Are you using React Server Components? › no
Would you like to use TypeScript (recommended)? yes
Which style would you like to use? › Default
Which color would you like to use as base color? › Slate
Where is your global CSS file? › app/tailwind.css
Do you want to use CSS variables for colors? › yes
Where is your tailwind.config.js located? › tailwind.config.js
Configure the import alias for components: › ~/components
Configure the import alias for utils: › ~/lib/utils
Are you using React Server Components? › noAnd finally add tailwind.css to the app. In app/root.tsx file, import the tailwind.css file:
import styles from './tailwind.css';

export const links: LinksFunction = () => [
  { rel: 'stylesheet', href: styles },
  ...(cssBundleHref ? [{ rel: 'stylesheet', href: cssBundleHref }] : []),
];
import styles from './tailwind.css';
export const links: LinksFunction = () => [
{ rel: 'stylesheet', href: styles },
...(cssBundleHref ? [{ rel: 'stylesheet', href: cssBundleHref }] : []),
];We will use the popular list-detail route pattern to display widgets. We will show user list of widgets and when user clicks an item, show the selected item details in a Modal view.
First lets add some code to retrieve list of widgets.
Create app\models folder and add widget.ts file. Copy following code into app\models\widget.ts:
export interface Widget {
  widgetId: number;
  widgetName: string;
  widgetNumber: string;
}

export function getNewWidget() {
  return {
    widgetId: undefined,
    widgetName: '',
    widgetNumber: '',
  };
}
export interface Widget {
widgetId: number;
widgetName: string;
widgetNumber: string;
}
export function getNewWidget() {
return {
widgetId: undefined,
widgetName: '',
widgetNumber: '',
};
}Here we are declaring Widget model type and getNewWidget function to return empty widget.
Next add widget.server.ts file to app\models. In real project, this is where you will be calling your backend/database. For this example, we will just create dummy data.
import { Widget } from '~/models/widget';

// get list of widgets
export async function getList() {
  const widgets: Widget[] = [];
  for (let i = 0; i < 33; i++) {
    widgets.push({
      widgetId: i + 1,
      widgetName: `Widget ${i + 1}`,
      widgetNumber: `W-${i + 1}`,
    });
  }
  return widgets;
}

// get a single widget
export async function get(id: number) {
  return {
    widgetId: id,
    widgetName: `Widget ${id}`,
    widgetNumber: `W-${id}`,
  };
}
import { Widget } from '~/models/widget';
// get list of widgets
export async function getList() {
const widgets: Widget[] = [];
for (let i = 0; i < 33; i++) {
widgets.push({
widgetId: i + 1,
widgetName: `Widget ${i + 1}`,
widgetNumber: `W-${i + 1}`,
});
}
return widgets;
}
// get a single widget
export async function get(id: number) {
return {
widgetId: id,
widgetName: `Widget ${id}`,
widgetNumber: `W-${id}`,
};
}Ok, now that we have a way to get data, lets show the list of widgets UI.
Display Item List
We will show users a list of items and when they click an item, show the selected item details in a Modal view, this way preserving the user context.
Create app\routes\widget.tsx as shown below:
import { json } from "@remix-run/node";
import { Link, Outlet, useLoaderData } from "@remix-run/react";

import { Widget } from "~/models/widget";
import * as widgetDb from "~/models/widget.server";

export async function loader() {
  const widgetList: Widget[] = await widgetDb.getList();
  return json({ widgetList });
}

export default function WidgetRoute() {
  const { widgetList } = useLoaderData<typeof loader>();
  return (
    <div className="h-full overflow-auto">
      {widgetList.map((w) => (
        <div key={w.widgetId} className="m-4 rounded-md border p-4">
          <div className="text-large font-semibold">{w.widgetName}</div>
        </div>
      ))}
    </div>
  );
}
import { json } from "@remix-run/node";
import { Link, Outlet, useLoaderData } from "@remix-run/react";
import { Widget } from "~/models/widget";
import * as widgetDb from "~/models/widget.server";
export async function loader() {
const widgetList: Widget[] = await widgetDb.getList();
return json({ widgetList });
}
export default function WidgetRoute() {
const { widgetList } = useLoaderData<typeof loader>();
return (
<div className="h-full overflow-auto">
{widgetList.map((w) => (
<div key={w.widgetId} className="m-4 rounded-md border p-4">
<div className="text-large font-semibold">{w.widgetName}</div>
</div>
))}
</div>
);
}Route file has loader method to get list of widgets and WidgetRoute component to display list of widgets.
We are using hook useLoaderData get widgetList that was sent from our loader and just iterate over it to display list of widgets.
Start project with npm run dev and go to http://localhost:3000/widget
You should see first 20 widgets 🚀 You can even turn off JavaScript and it will still show first 20 widgets thanks to Remix SSR! ✨
Display Item Detail
When user selects an item from the widget list, we want to display the selected item details.
We will use Link component to let user select an item. The to property of link component will let user navigate to item detail by changing URL from /widget to /widget/${id}
And to show item details, add an Outlet component. Remix docs define Outlet as "A component rendered inside of a parent route that shows where to render the matching child route". Basically, as the name implies, it provides an outlet to render child route inside the parent route!
Add <Outlet \> component just below <div className="h-full overflow-auto"> in app\routes\widget.tsx file and wrap each Widget in a Link to navigate to /widget/:id detail route.
export default function WidgetRoute() {
  const { widgetList } = useLoaderData<typeof loader>();
  return (
    <div className="h-full overflow-auto">
      <Outlet />
      {widgetList.map((w) => (
        <Link key={w.widgetId} to={`${w.widgetId}`}>
          <div className="m-4 rounded-md border p-4">
            <div className="text-large font-semibold">{w.widgetName}</div>
          </div>
        </Link>
      ))}
    </div>
  );
}
export default function WidgetRoute() {
const { widgetList } = useLoaderData<typeof loader>();
return (
<div className="h-full overflow-auto">
<Outlet />
{widgetList.map((w) => (
<Link key={w.widgetId} to={`${w.widgetId}`}>
<div className="m-4 rounded-md border p-4">
<div className="text-large font-semibold">{w.widgetName}</div>
</div>
</Link>
))}
</div>
);
}And remember to import the Outlet component
import { Link, Outlet, useLoaderData } from '@remix-run/react';import { Link, Outlet, useLoaderData } from '@remix-run/react';Ok, now lets display the widget details. Add app\routes\widget.$id.tsx as follows:
import { LoaderFunctionArgs, json } from "@remix-run/node";
import { useLoaderData, useNavigate } from "@remix-run/react";

import { getNewWidget } from "~/models/widget";
import * as widgetDb from "~/models/widget.server";

export async function loader({ params, request }: LoaderFunctionArgs) {
  const id = +(params?.id || 0);
  if (!id || id == 0) {
    return json({ widget: getNewWidget() });
  }
  //
  const data = await widgetDb.get(id);
  if (!data) {
    throw new Response("Widget not found", { status: 404 });
  }
  return json({ widget: data });
}

export default function WidgetDetailRoute() {
  const { widget } = useLoaderData<typeof loader>();
  return (
    <div className=" rounded-md border p-4">
      <div className="text-large font-semibold">{widget.widgetName}</div>
      <div>{widget.widgetNumber}</div>
    </div>
  );
}
import { LoaderFunctionArgs, json } from "@remix-run/node";
import { useLoaderData, useNavigate } from "@remix-run/react";
import { getNewWidget } from "~/models/widget";
import * as widgetDb from "~/models/widget.server";
export async function loader({ params, request }: LoaderFunctionArgs) {
const id = +(params?.id || 0);
if (!id || id == 0) {
return json({ widget: getNewWidget() });
}
//
const data = await widgetDb.get(id);
if (!data) {
throw new Response("Widget not found", { status: 404 });
}
return json({ widget: data });
}
export default function WidgetDetailRoute() {
const { widget } = useLoaderData<typeof loader>();
return (
<div className=" rounded-md border p-4">
<div className="text-large font-semibold">{widget.widgetName}</div>
<div>{widget.widgetNumber}</div>
</div>
);
}Just like typical Remix route file, we have a loader and WidgetDetailRoute component. Loader retrieves widget id from URL params and gets widget details for that id. useLoaderData hook is then used to get widget detail in WidgetDetailRoute component and display details.
Start project with npm run dev and go to http://localhost:3000/widget and select a widget, you should see URL change to /widget/:id and UI will display the selected widget details at top of the page, where the <Outlet/> component was placed.
Modal Route
Now that we have the basic item detail route working, lets display Widget details in a Modal!
Start by installing Dialog component
npx shadcn-ui@latest add dialognpx shadcn-ui@latest add dialogNext, change WidgetDetailRoute function in file widget.$id.tsx as follows:
import {
  Dialog,
  DialogContent,
  DialogHeader,
  DialogTitle,
} from "~/components/ui/dialog";

export default function WidgetDetailRoute() {

  const { widget } = useLoaderData<typeof loader>();
  const navigate = useNavigate();

  const handleClose = () => {
    navigate(-1);
  };

  return (
    <Dialog
      open={true}
      onOpenChange={(open: boolean) => {
        open ? () => {} : handleClose();
      }}
    >
      <DialogContent className="sm:max-w-[425px]">
        <DialogHeader>
          <DialogTitle>Widget</DialogTitle>
        </DialogHeader>
        <div className="grid gap-4 py-4">
          <div className="grid grid-cols-4 items-center gap-4">
            {widget.widgetName}
          </div>
          <div className="grid grid-cols-4 items-center gap-4">
            {widget.widgetNumber}
          </div>
        </div>
      </DialogContent>
    </Dialog>
  );
}
import {
Dialog,
DialogContent,
DialogHeader,
DialogTitle,
} from "~/components/ui/dialog";
export default function WidgetDetailRoute() {
const { widget } = useLoaderData<typeof loader>();
const navigate = useNavigate();
const handleClose = () => {
navigate(-1);
};
return (
<Dialog
open={true}
onOpenChange={(open: boolean) => {
open ? () => {} : handleClose();
}}
>
<DialogContent className="sm:max-w-[425px]">
<DialogHeader>
<DialogTitle>Widget</DialogTitle>
</DialogHeader>
<div className="grid gap-4 py-4">
<div className="grid grid-cols-4 items-center gap-4">
{widget.widgetName}
</div>
<div className="grid grid-cols-4 items-center gap-4">
{widget.widgetNumber}
</div>
</div>
</DialogContent>
</Dialog>
);
}We are using Radix Dialog/Modal component to display Widget Details. When the route renders in the Outlet, UI will show Dialog as we have it open by default. When user closes dialog, we navigate back to the previous parent route using useNavigate hook.
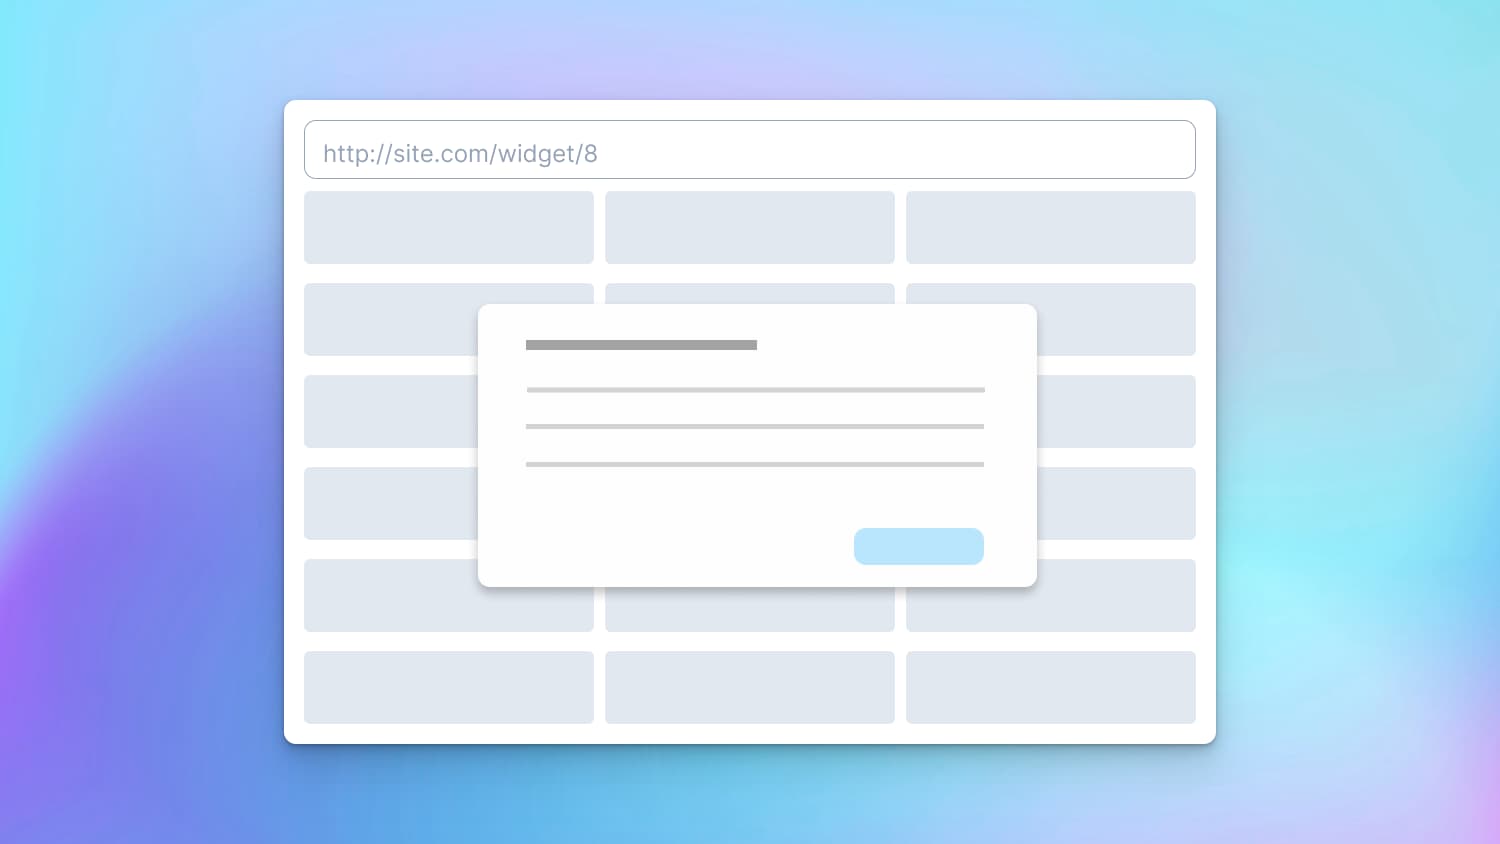
Update file for appropriate imports and start project with npm run dev and go to http://localhost:3000/widget and select a widget, you should see URL change from /widget to /widget/:id and UI will display the selected widget details in a Modal Dialog on top of existing list of widgets.
Next Steps
Hopefully you now have a good idea of how to display route details in a Modal. Fundamentally, with routing, we can decide when (nested route), where (Outlet), and how to display the route (Modal).
Find Source code with a ready to run project @ GitHub
RemixFast
RemixFast will auto generate List-Modal Detail route with full integration to database and integrated UI, security and host of other features. Go beyond traditional coding and experience 10x faster Remix app development with RemixFast!
Remix Kanban Board
Learn how to develop a Kanban board with drag-and-drop, workflow with error handling and optimistic UI.