How to Build a Budgeting App Like Mint With RemixFast
Learn how to build a personal finance app for income and expense tracking using RemixFast's Visual Editor.
This tutorial will walk you through step-by-step process of building a budgeting app like Mint, YNAB, or PocketGuard with RemixFast Visual Editor. Idea is to build out some of the core foundation features that can be used in a personal finance app or other apps that utilize similar process flow.
Steps to build a Mint clone with RemixFast:
- Identify and Create Models
- Create UI by adding Route
- Preview running app
- Enhance functionality
- Download codebase and run it locally
Contents
Statement of Work
Build a Personal Budget Tracking application, will allow user to create different budgets to track and for each budget, enter list of income and expenses by category. This will be our MVP
Model-Driven App Development
We will use the model-driven app development concept to design and build our app! Lets start by figuring out which models we want to create.
Here is our goal statement again with potential models:
Build a Personal Budget Tracking application, will allow user to create different budgets to track and for each budget, enter list of income and expenses by category.
Following are models that we will use:
- Budget
- Income
- Expense
- ExpenseCategory
Build
Lets build our Mint Clone Visually! Login to RemixFast and create a new app. Enter following
App Name: Minty
Stater Kit: SaaS Stater Kit (default)
App Name: Minty
Stater Kit: SaaS Stater Kit (default)Create Model
Select newly created Minty app and ensure you are on Models tab.
Click Import Prisma Schema and select/upload this Prisma Schema file
Notice we added 4 tables, Budget, Expense Category, Income and Expense. You might want to rearrage them so that they are grouped together.
Enhance Budget Model
It will be useful to show user total income and total expense for a given budget. Lets add calculated columns to aggregate data by budget. Note that these columns won't be in database, they are just derived columns.
Drag incomeAmount column from Income table and Drop it on to Budget table. On the Add Child Related Field dialog, enter following:
Child Related Model: Select > Income
Child Related Field: Select > Income Amount
Aggregate Function: Select > Sum
Child Related Model: Select > Income
Child Related Field: Select > Income Amount
Aggregate Function: Select > SumClick Add to create new aggregate field incomeAmountSum.
Next Drag expenseAmount column from Expense table and Drop it on to Budget table. On the Add Child Related Field dialog, enter following:
Related Model: Select > Expense
Related Field: Select > Expense Amount
Aggregate Function: Select > Sum
Related Model: Select > Expense
Related Field: Select > Expense Amount
Aggregate Function: Select > SumClick Add to create new aggregate field expenseAmountSum.
Add Routes
Now that we have defined models, it is time to add routes and ui!
When you add a route in RemixFast, it will generate loaders, actions and views based on the selected route template. We will use Visual Editor to configure and design generated views as well as changing various default behaviors.
Budget
Click Routes tab in Visual Editor and Click Add Route and enter following:
Template: Card List + Detail Form
Model: Select > Budget
Label: Budget (default)
Template: Card List + Detail Form
Model: Select > Budget
Label: Budget (default)Click Save, this will create backend routes (list and detail) and corresponding UI Views, Card List View for list route and Form View for detail route.
Budget List View
Lets modify Budget UI Views. Select Budget List View (first route) and select Components panel. Drag Expression Field and Drop it under Budget Name field. Select newly added field and enter
Field Label: Month Year
Field Expression: ${budgetMonth}-${budgetYear}
Field Label: Month Year
Field Expression: ${budgetMonth}-${budgetYear}Budget Form View
Select Budget Form View (second route) and enter
Select > Tenant Name > Check > Is Hidden
Select > Income Amount > Check > Is ReadOnly
Select > Expense Amount > Check > Is ReadOnly
Select > Tenant Name > Check > Is Hidden
Select > Income Amount > Check > Is ReadOnly
Select > Expense Amount > Check > Is ReadOnlyWe don't need to show field tenantId as it is only used for tracking. Fields Income Amount and Expense Amount are calculated fields and hence Read Only
Select Budget Description and enter
Type: Select > Multi Line TextType: Select > Multi Line TextSelect Budget Year and enter
Type: Select List
List Values:
2023 > Add
2024
Type: Select List
List Values:
2023 > Add
2024Click Save to save list of years.
Alternatively you can also create lookup tables for month and year in database and user Type: Picker to create lookup list for each field.
Select Section with Total Income and Total Expense and enter
Display Condition > Select > Add Field Condition
Select Field > Select > budgetId
Select Criteria > Select > Exists
Display Condition > Select > Add Field Condition
Select Field > Select > budgetId
Select Criteria > Select > ExistsClick Done to setup a display condition to ensure that we show section only after budget has been created. (budgetId exists!)
Let rearrange and clean up the UI, use Drag and Drop to rearrage UI as following
Budget Name | Spend Limit Budget Description Budget Month | Budget Year Income Amount | Expense Amount Created By | Created Date Updated By | Updated Date
We can make more changes, but lets leave it for later and continue with building rest of the application.
Income
Click Add Route and enter following:
Template: Table List + Detail Form
Model: Select > Income
Label: Income (default)
Template: Table List + Detail Form
Model: Select > Income
Label: Income (default)Click Save This will create backend routes (list and detail) and corresponding UI View, Table View for list route and Form View for detail route.
Inspect Income List View and Income Form View. For Income Form, hide the Tenant Name as you did on Budget form. Feel free to rearrange as desired
Expense Category
Click Add Route and enter following:
Template: Table List + Detail Form
Model: Select > Expense Category
Label: Expense Category(default)
Template: Table List + Detail Form
Model: Select > Expense Category
Label: Expense Category(default)This will create backend routes (list and detail) and corresponding UI View, Table List View for list route and Form View for detail route. Hide Tenant Name(Id) on form view and rearrange UI as desired.
Expense
Click Add Route and enter following:
Template: Table List + Detail Form
Model: Select > Expense
Label: Expense (default)
Template: Table List + Detail Form
Model: Select > Expense
Label: Expense (default)This will create backend routes (list and detail) and corresponding UI View, Table List View for list route and Form View for detail route.
Inspect Expense List View and Expense Form View. For Expense Form, hide the Tenant Name as you did on Budget form. Feel free to rearrange as desired
Rearrange Expense Form UI as follows
Budget Name | Category Name | Tenant Id
Expense Name | Expense Amount
Expense Description
Expense Month | Expense Year
Created By | Created Date
Updated By | Updated Date
Budget Name | Category Name | Tenant Id
Expense Name | Expense Amount
Expense Description
Expense Month | Expense Year
Created By | Created Date
Updated By | Updated DateDashboard
Click Add Route and enter following:
Template: Dashboard
Label: Dashboard (default)
Template: Dashboard
Label: Dashboard (default)Click Save to create Dashboard route.
Stat List Widget
Select Dashboard route and drag Stats from the Components panel and enter following:
Model: Select > Budget
Stat Data Field: Select > Income Amount (incomeAmountSum)
Model: Select > Budget
Stat Data Field: Select > Income Amount (incomeAmountSum)Click Save to create Total Income Stat.
Click Budget Stats and then select Fields property pane. Drag Expense Amount from Fields panel and Drop it after Total Income Stat.
Expense By Category Chart
Click Add Chart and enter select Setup using AI and enter following:
Chart Name: Expense By Category
Purpose Of Chart: Display total expense grouped by category for current month and current year.
Chart Name: Expense By Category
Purpose Of Chart: Display total expense grouped by category for current month and current year.Click Save. This will use AI to create Expense By Category Query (you can see it on model view) and add Chart to the Dashboard.
Preview
Select Routes tab on Visual Editor and Click Preview button to instantly run (preview) the application.
Create Expense Categories
Select Expense Category and click Add on Expense Category list view and enter following
Category Name: Rent > Add > Add
Category Name: Health
Category Name: Rent > Add > Add
Category Name: HealthCreate Budget
Select Budget tab and click Add and enter following
Name: Dec
Limit: 10000
Month: 12
Year: Select > 2023
Name: Dec
Limit: 10000
Month: 12
Year: Select > 2023Click Add. Lets add two more budgets
Create Income
Select Income tab and click Add and enter following
Budget Name: Dec
Income Name: Job
Income Amount: 10000
Income Month: 12
Income Year: Select > 2023
Budget Name: Dec
Income Name: Job
Income Amount: 10000
Income Month: 12
Income Year: Select > 2023Create Expense
Select Expense tab and click Add and enter following
Budget: Dec
Category Name: Rent
Name: Rent
Amount: 1250
Month: 12
Year: Select > 2023
Budget: Dec
Category Name: Rent
Name: Rent
Amount: 1250
Month: 12
Year: Select > 2023Budget: Dec
Category Name: Health
Name: Gym
Amount: 250
Month: 12
Year: Select > 2023Budget: Dec
Category Name: Health
Name: Gym
Amount: 250
Month: 12
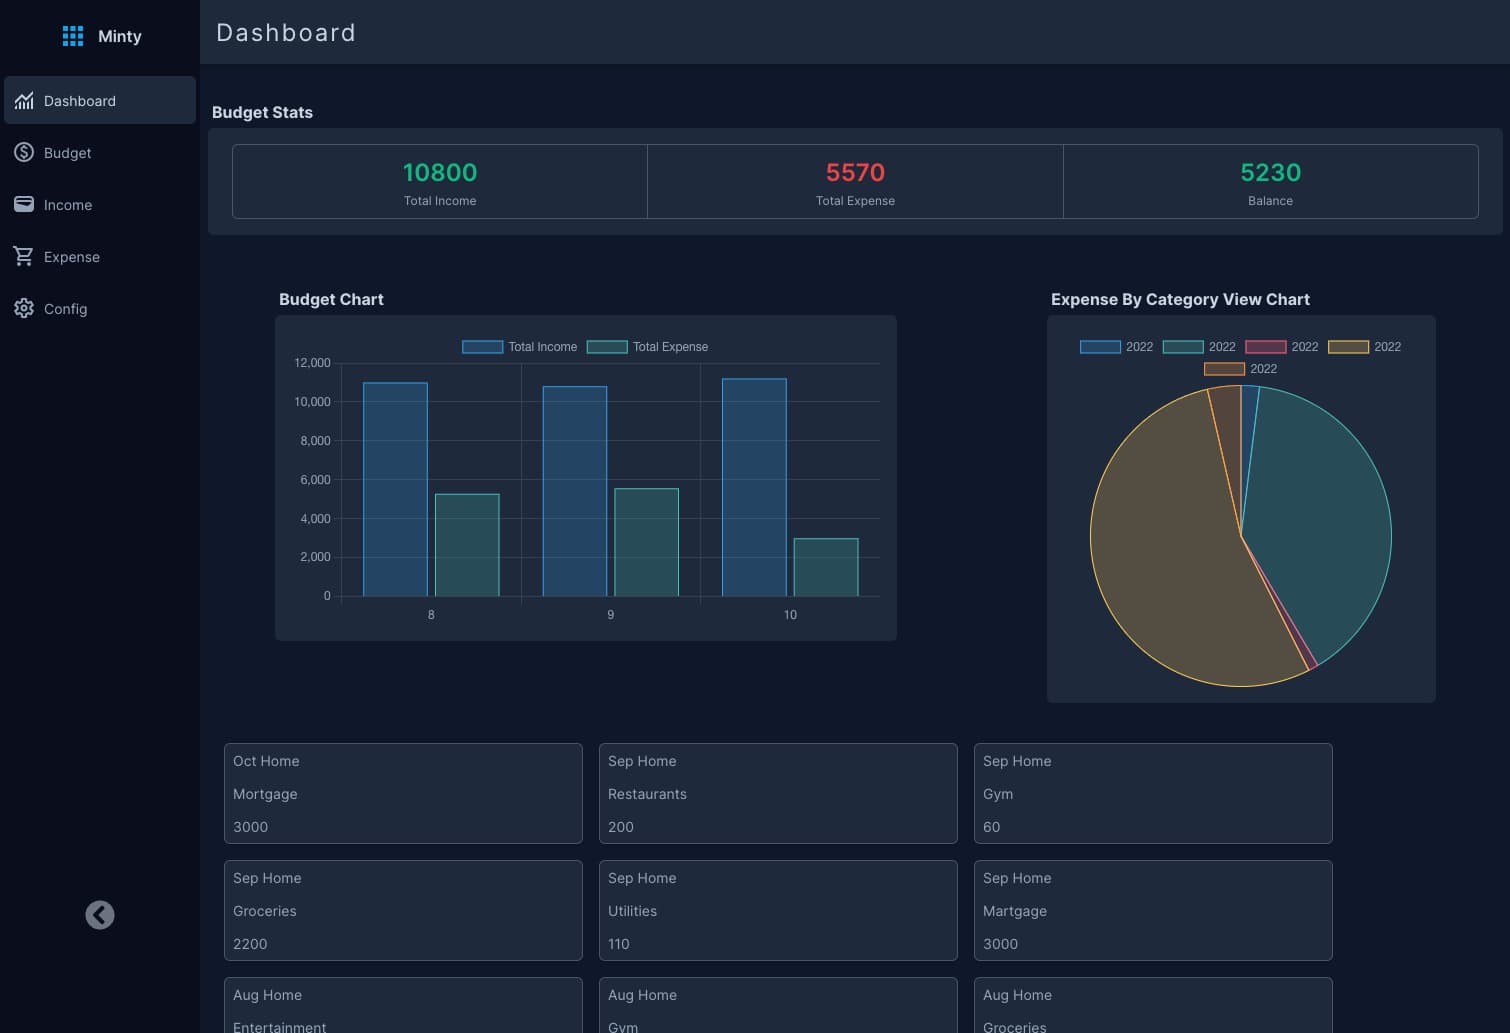
Year: Select > 2023Dashboard
Select Dashboard and see Budget for current month as well as Chart of monthly income and expenses.
Click Done to return to Visual Editor
Download
Click Export Code and enter
Version: 1.0.0
And Click Export Code in dialog. Once code has been exported, select Code tab in Visual Editor. Code tab shows exported Minty project. Explore files included in codebase. Click Download to download codebase. Once downloaded, expand it and open in editor.
Run npm run init to initialize the project. This will download node modes and create prisma client and seed the database. Once completed, run the project with npm run dev. Add data and test the app.
Next Steps
RemixFast can help you build app similar to a Mint clone or any other app your choose remarkably fast. Jumpstart your next project with a generated codebase that covers 60% to 80% of traditional development and concentrate on engineering your core functionality!